Tuesday, 5 November 2013

Squid 3.3.10 - Transparent Proxy for HTTP and HTTPS

Hey there,

for several years the squid proxy can be used as transparent proxy for HTTP and also HTTPS. As I was curious how it will work and how hard it is to setup, I've just installed and configured it.

First I installed a fresh virtual machine with Debian 7.2. In Debian you could either install Squid 2.7 or Squid 3.1 via apt-get (apt-get install squid or apt-get install squid3). Unfortunately to make a transparent proxy that also supports all HTTPS features, at least version 3.2 is needed. So I downloaded the latest sources (Version 3.3.10) directly from squid-cache.org. Before installing, the following packages should be installed in Debian, otherwise errors will pop-up during configure or make:
# apt-get install build-essential
# apt-get install libssl-dev
After unpacking the squid sources it is important to use the following configure statement, to activate ssl, because it is disabled by default:
#./configure --prefix=/usr/local/squid --enable-icap-client --enable-ssl --enable-ssl-crtd --with-default-user=squid
Afterwards you can compile and install squid:
# make all
# sudo make install
Now squid is installed in /usr/local/squid. As next step the user squid should be created and the log directory should be allocated to that user:
# useradd squid
# chown -R squid:squid /usr/local/squid/var/logs/
The next steps I've copied from the squid documentation (2): 
Afterwards you must create the swap directories. Do this by running Squid with the -z option:
# /usr/local/squid/sbin/squid -z
Once the creation of the cache directories completes, you can start Squid and try it out. Probably the best thing to do is run it from your terminal and watch the debugging output. Use this command:
# /usr/local/squid/sbin/squid -NCd1
If everything is working okay, you will see the line:
Ready to serve requests. 
If you want to run squid in the background, as a daemon process, just leave off all options:
# /usr/local/squid/sbin/squid
Now you should have a running squid on port 3128. But we still do not support HTTPS requests and the proxy is still not transparent. The next steps will be modifing squid.conf and put in some iptables rules. But at first we need to create our your own CA (Certificate Authority):
# cd /usr/local/squid
# mkdir ssl_cert
# cd ssl_cert
# openssl req -new -newkey rsa:1024 -days 365 -nodes -x509 -keyout myCA.pem -out myCA.pem
This pem file can now be imported in your certificate store in your browser. Then you will not get any certificate errors when surfing HTTPS sites later via our transparent squid.
Next we need to replace the line "http_port 3128" with the following lines in /usr/local/squid/etc/squid.conf:
http_port 3128 intercept
https_port 3127 intercept ssl-bump generate-host-certificates=on dynamic_cert_mem_cache_size=4MB cert=/usr/local/squid/ssl_cert/myCA.pem
acl broken_sites dstdomain .example.com
ssl_bump none localhost
ssl_bump none broken_sites
ssl_bump server-first all
sslcrtd_program /usr/local/squid/libexec/ssl_crtd -s /usr/local/squid/var/lib/ssl_db -M 4MB
sslcrtd_children 5
Also ip-forwarding needs to be activated:
# echo "1" > /proc/sys/net/ipv4/ip_forward
Finaly we need to insert our iptables rules to redirect the traffic to squid:
# iptables -t nat -A PREROUTING -i eth0 -p tcp -m tcp --dport 80 -j REDIRECT --to-ports 3128
# iptables -t nat -A PREROUTING -i eth0 -p tcp -m tcp --dport 443 -j REDIRECT --to-ports 3127
# iptables -I INPUT -p tcp -m tcp --dport 3127 -j ACCEPT
Another folder needs to be created, for the dynamically generated certificates:
# mkdir /usr/local/squid/var/lib
# /usr/local/squid/libexec/ssl_crtd -c -s /usr/local/squid/var/lib/ssl_db -M 4MB
# chown -R squid:squid /usr/local/squid/var/lib/ssl_db/
Now you should start squid in debugging mode:
# /usr/local/squid/sbin/squid -NCd9
If the process is running and you get something similar to this, you work was successfull:
2013/11/04 22:39:16| Accepting NAT intercepted HTTP Socket connections at local=0.0.0.0:3128 remote=[::] FD 19 flags=41
2013/11/04 22:39:16| Accepting NAT intercepted SSL bumped HTTPS Socket connections at local=0.0.0.0:3127 remote=[::] FD 20 flags=41
To fully work as transparent HTTPS proxy, your clients in the network needs now the IP of this proxy as gateway address and the pem certificate needs to be imported in the browser of the clients. 

Now you can start squid by exeuting:
# /usr/local/squid/sbin/squid

Debugging:

If you have any problems you should check if squid and their ports are running. You can do this by using netstat:
# netstat -tulpen
You should then see port 3128 and 3127. If not execute "killall squid" several times and restart squid in debugging mode with 
# /usr/local/squid/sbin/squid -NCd9
You can also have a look at the access.log during browsing or via tcpdump to see if the packets are really arriving at your proxy. 

Hint:
This was just a quick'n'dirty how-to on how a transparent proxy supporting HTTPS can be created. This setup is for lab environments to get to know squid and it's capabilites and not for productive use. For example your private key is in the pem certificate which should be seperated from the certificate your deploying to your browser. 

Links
(1) Download Squid Source
(2) Installing Squid
(3) Dynamics SSL Certificate Generation
(4) SSL Bump

Sunday, 20 October 2013

X Forwarding with SSH - Magic-Cookie problem

Hey there,

I've mentioned in one of my last posts, that it is possible to forward X via SSH. In my case I'm connecting from my Mac OS X client to my Rasperry PI running Kali Linux. I'm using the X forwarding feature of ssh to start tools that would need X on my Raspberry Pi, but the window will pop up in Mac OS X, as long as X11 is started on my Mac. If this was too confusing, you can just read this, and I think you will get it ;-)

I've just got one problem when doing this: When I log into Kali Linux I'm using an unprivileged account, let's say the account name is alice. The problem is that some tools need root-privileges, like Wireshark (of course you can also run tcpdump, but Wireshark is just an example). If I switch to the root account via su, the X forwarding for the application I want to start is not working anymore:

root@kali:~# wireshark
(wireshark:2810): Gtk-WARNING **: cannot open display: localhost:11.0

I'm getting this error because when the ssh connection is initiated a file called .Xauthority is created in the home directory of alice. This file contains a "session cookie" called Magic-Cookie. When I want to start now the application as root, the content of this file is not available to the root account, so I have to copy the .Xauthority file to the home folder of the root account:

# su -
# cp /home/alice/.Xauthoriy /root/

Then the Magic-Cookie will also be available for the root account and now wireshark can be started. If it is still not working you should check the environment variable DISPLAY. The DISPLAY variable of alice needs to be the same as in the root account.

To automate this task, I've created the file .bash_profile in the root directory:

# touch /root/.bash_profile
# vim /root/.bash_profile

and added the following content:

# cp /home/alice/.Xauthoriy /root/

Now everytime when I change to the root account the .Xauthority will be copied in the home folder of the root account and the X forwaring feature is still working.

If you have better/other solutions for this problem, feel free to leave a comment.
Cheers.


Sunday, 13 October 2013

ssh and tmux

Hi there,

with tmux you can make your life a little more easy, if you have to work on the command line or manage one or more servers. So here is what I did:

If I connect to one of my servers via ssh I'm doing this always via my ssh key. Here you can find a detailed guide on how to setup a connection via ssh by using a key and a password for the key. If you're using this kind of authentication you just have to remember one password (the one for your private key) and you can login to any server you distributed your public key to. So now you can easily connect to your server(s) without creating another password for your user on another server.

But after login you have still just one shell available but maybe you need sometimes more shells but don't want to login for it. Thats the moment when you should start tmux.

As there are already some good tutorials and explanations I don't want to make my own one here so just visit here, herehere (german) or here as a starting point.

There is also a book available about tmux. I didn't read it, but maybe useful for someone who wants to dive deeper into tmux.

Cheers.

Saturday, 12 October 2013

Be your own cloud provider and kick out Google Calendar, Dropbox and co. - Part 2 File Sync

Hey there,

so after I was able to sync all my calendar entries with all my devices by using OwnCloud, the next step is to use it as Dropbox replacement.

The main purpose for me using Dropbox was always to store documents like PDFs (books, whitepapers etc.) and to read them on my iPad. It was very convenient  and I didn't had to worry about backups, as the files were on my mobile devices, my laptop and in my Dropbox and it was also very convenient to share the files with others.

Here is the configuration, that I'm using now instead of Dropbox:
  1. iOS: I'm using an app called "Good Reader" on my iPad in order to read all kinds of documents and Good Reader also provides an interface to connect to your Dropbox. It is possible for every App that can talk to a WebDAV server to connect to your OwnCloud. In Good Reader I just needed to add a new WebDAV server,  insert the URL accordingly to the manual of OwnCloud (e.g. https://example.com/owncloud/) put in your credentials and afterwards you can sync all data with Good Reader. You can sync data that is already available in your OwnCloud with Good Reader or upload files to OwnCloud via Good Reader. It's working for me now as convenient as Dropbox. 
  2. Mac OS X: I wanted to use the Finder of Mac OS X for connecting to OwnCloud, as described here. Unfortunately it is not working as expected. I'm able to connect to my server via WebDAV and I can navigate through the directories, but when I want to create a folder or upload a file, it takes minutes and then the operation I wanted to execute did not succeed. I couldn't find out the problem, so I switched to Cyberduck. With Cyberduck I'm not having any problems and it I've got a good performance. 
  3. Windows: In Windows it was no problem to map the WebDAV share to a drive letter. Maybe you need to tweak on the registry, but I didn't had to do it on my Windows 7 Professional Laptop. 
With this configuration I can access now all my files via iOS, Mac OS X and Windows. But to access the files I need to be online, otherwise the files will not be available. To access your files also when your offline you can use the Sync-Clients by OwnCloud.
In Windows it worked without any errors, but on Mac OS X I alway got the following error when I wanted to connect to my server via HTTPS:
Die Verbindung zu OwnCloud konnte nicht hergestellt werden: Im Ablauf des SSL-Protokolls ist ein Fehler aufgetreten.
respectively in english:
Failed to connect to ownCloud: SSL-Handshake failed
When I added the parameter "ServerName" to /etc/apache2/apache2.conf and did a restart of apache I was also able to connect to my OwnCloud with the Mac OS X Sync-Client.

So now I can share my calendar and files between all my devices with my OwnCloud and do not have to use Dropbox, iCloud or another cloud provider.

Great success :-)

Wednesday, 18 September 2013

Be your own cloud provider and kick out Google Calendar, Dropbox and co. - Part 1 Calendar

Hey there,

I want to make a little experiment to get as much data in my own cloud and not using services like Google Calendar or iCloud. Especially because of all the things regarding Edward Snowden disclosed confirmed all our paranoid thoughts about a big brother scenario and total surveillance and I want to try to be the master of my data as much as possible now. And of course I'm curious what can be done with services like OwnCloud.

What I want is to be my own cloud provider by using my own root-server and all my devices (laptop, smartphone and tablet) can use this server to sync their data. Actually I've used such cloud services like Google Calendar or Dropbox, but never trusted those services and I always felt uncomfortable and thats why I  didn't use cloud services e.g. for syncing my contacts. I've always synced my contacts directly via my laptop to my other devices.

My goal is to get as much data on my own server so it's under my control and not stored on some server or on a server somewhere in the US that will be monitored by some agency. Of course this server will be the single point of failure, and if it get's hacked all my data will be disclosed or compromised, but hey, at least I'm responsible now for my data.

First thing I've done is installing OwnCloud on my Debian server, see the link here for further installation instructions. Afterwards you can navigate to your web server by adding /owncloud to your URL, e.g. https://www.dummy.org/owncloud for further configuration.

I wanted to use the MySQL service as database for OwnCloud, as it is already running on my server:

1. Connect to MySQL and create a database for OwnCloud:
root@kali # mysql -u root -p
mysql> create database owncloud;

2. Create a user for the new database owncloud and grant all privileges to him
mysql> GRANT ALL PRIVILEGES
    -> ON owncloud.*
    -> TO 'owncloudUser'@'localhost'
    -> IDENTIFIED BY '<your password here>'
    -> WITH GRANT OPTION;
3. Now you can go again to https://www.dummy.org/owncloud and type in the name of the database you want to use for OwnCloud and the user and password for it. Also an administrator user will be created for the web interface.
Afterwards you can finish the installation and your OwnCloud is ready. You should also use SSL for your OwnCloud, so that your communication channel is encrypted. If you don't use SSL now and you don't want to spend money for an SSL certificate you should consider to create a server certificate at CAcert. Don't forget to import the root Certificate of CAcert into your browser and devices that want to use OwnCloud, so you have a trusted connection to your server.

So what can you do now by using OwnCloud? After logging into your OwnCloud you have the opportunity to share a calendar, contacts, data, pictures and music.

I just wanted to use the calendar service for now. To synchronize the calendar with your iOS device, just follow the manual at owncloud.org. You can also synchronize it with iCal on OS X and also with Lightning in Thunderbird. In Lightning you need the CalDav link that points directly to your calendar. You can find that link in OwnCloud 5 if you navigate to calendar, click on the settings symbol in the right corner and click on the little earth symbol in the row of your calendar. Then the CalDav link will appear. In Lightning you just need to create a new calendar, choose network, select CalDav as format and paste the URL in the address field. Then you just need to fill in the credentials in the login dialog that will pop-up and you have also the OwnCloud calendar in Thunderbird Lightning.

You can also sync the calendar with Android devices, but you need a 3rd party app like Card-Dav Sync. As I've got no Android device, I could not test it, so if there are better apps or if it is supported by the OS by now, feel free to leave a comment.

For me this setup is working fine now. I'm using it on OS X in iCal, on my iPhone, iPad and also another Windows Laptop has access to the calendar via Thunderbird Lightning and all via SSL. First step is done to get your own secure datastore.

For backup purposes here is a little hint what you want to backup on another machine to restore your data in OwnCloud, if the server crashes.

Cheers.

Sunday, 15 September 2013

Raspberry Pi and Nano USB WiFi (EDIMAX EW-7811Un) on Kali Linux

Hey there,

yesterday my order arrived. An Wireless USB Adapter for my Raspberry Pi. Right after plugging it into the Pi and booting it up, it was found:
root@kali:~# dmesg
...
usb 1-1.2: new high-speed USB device number 4 using dwc_otg
usb 1-1.2: New USB device found, idVendor=7392, idProduct=7811
usb 1-1.2: New USB device strings: Mfr=1, Product=2, SerialNumber=3
usb 1-1.2: Product: 802.11n WLAN Adapter
usb 1-1.2: Manufacturer: Realtek
usb 1-1.2: SerialNumber: 00e04c000001
You can also list the usb devices via lsusb, to make sure the device is recognized:
root@kali:~# lsusb
Bus 001 Device 002: ID 0424:9512 Standard Microsystems Corp.
Bus 001 Device 001: ID 1d6b:0002 Linux Foundation 2.0 root hub
Bus 001 Device 003: ID 0424:ec00 Standard Microsystems Corp.
Bus 001 Device 004: ID 7392:7811 Edimax Technology Co., Ltd EW-7811Un 802.11n Wireless Adapter [Realtek RTL8188CUS]
I'm using Kali 1.0.5 with the original kernel which is 3.6.11-cutdown:
root@kali:~# uname -r
3.6.11-cutdown
I've read that the since kernel 3.0 and higher a driver called rtl8192cu should be available that is supporting the chipset RTL8188CUS. After searching for "*8192*" I've found the module in kali:
root@kali:~# find / -name "*8192*" -print
/sys/bus/usb/drivers/rtl8192cu
/sys/module/8192cu
/sys/module/8192cu/drivers/usb:rtl8192cu
/opt/metasploit/apps/pro/ui/db/migrate/20130208192816_add_hidden_to_task_chain.rb
/lib/modules/3.6.11-cutdown/kernel/drivers/net/wireless/rtl8192cu
/lib/modules/3.6.11-cutdown/kernel/drivers/net/wireless/rtl8192cu/8192cu.ko
/lib/firmware/rtlwifi/rtl8192defw.bin
/lib/firmware/rtlwifi/rtl8192cfwU.bin
/lib/firmware/rtlwifi/rtl8192cfw.bin
/lib/firmware/rtlwifi/rtl8192cfwU_B.bin
/lib/firmware/rtlwifi/rtl8192cufw.bin
/lib/firmware/rtlwifi/rtl8192sefw.bin
/lib/firmware/RTL8192E
/usr/share/exploitdb/platforms/php/webapps/18192.txt
As no driver was loaded automatically, I've tried to load the module manually:
root@kali:~# modprobe 8192cu 
root@kali:~# lsmod
Module                  Size  Used by
ipv6                  207600  12
8192cu                411588  0
leds_gpio               1668  0
led_class               1788  1 leds_gpio
So the driver is loaded and now we can bring up the interface:
root@kali:~# ifconfig wlan0 up
root@kali:~# ifconfig wlan0
wlan0     Link encap:Ethernet  Hardware Adresse 80:1f:02:b3:50:8b
          UP BROADCAST RUNNING MULTICAST  MTU:1500  Metrik:1
          RX packets:0 errors:0 dropped:0 overruns:0 frame:0
          TX packets:0 errors:0 dropped:0 overruns:0 carrier:0
          Kollisionen:0 Sendewarteschlangenlänge:1000
          RX bytes:0 (0.0 B)  TX bytes:0 (0.0 B)
You can make a quick scan of available wifi networks via:
root@kali:~# iwlist wlan0 scan
Now you can either use the graphical WiFi manager or you can configure your WiFi via terminal, which is what I did. Just add the following lines to your /etc/network/interfaces:
auto wlan0
iface wlan0 inet dhcp
wpa-ssid <your SSID here>
wpa-psk <your wlan-key here>
After restarting the network you should have a working wifi connection.
root@kali:~# service networking restart


Note:
If you're using a hidden SSID you should read the following thread.

Saturday, 31 August 2013

Additional, useful Unix tools in Kali via apt-get

Hey there,

just today I found a new useful linux command called "mtr", ok this tool is available since the late 90s of the last century, but for me it was new. It is an enhanced traceroute and is much quicker than traceroute, as it combines traceroute with ping and you can gather much more information with mtr than with traceroute. As I also install some more useful Unix commands via apt-get on my Kali Linux for Raspberry Pi, I just give a short overview about them (also as reminder for me):

- mtr (as explained above, much more powerful than traceroute)
- htop (nicer view than the normal top)
- dstat (nice view of resource  consumption with timestamp, e.g. dstat --tclmgry)
- tree (shorter and much powerful version of "find . -type d")
- links (if you need a browser in the shell; it is no fun to surf the web in a cli, but sometimes it can be useful)
- bc (little calculator in the shell)
- colordiff (you can guess it by the name, it enhances diff by adding color)
- tmux (alternative to screen)
- vim (no, I don't use emacs ;-)

A really great tool is tmux, that makes you're life in the shell much more easy. You should read the FAQ of OpenBSD to tmux for a quick'n'dirty introduction in it.

If you have any commands that are also useful for you regarding pentesting or to work more efficiently just leave a comment.

Another very useful tool for Mac OS X, regarding ssh is csshX. You can install it easily via homebrew on your Mac and you can manage different ssh sessions at once and you have also a master window that sends all input to every ssh session. Pretty neat.


Wednesday, 28 August 2013

Raspberry PI and Pentesting

Hey everybody,

I've got a Raspberry PI for one year now and at the beginning I was just playing around with it as Media Center, but then it was laying around and I didn't use it for several months.

This had to change, so I ordered a HDMI2DVI cable from Amazon, as I wanted to use it on my monitor that has only DVI and no HDMI. I ordered also a 16 GB SanDisk Class 10 Ultra SHDC memory card, You can find a detailed overview about memory cards that are working with the Raspbery Pi here.

Here you can find a list of several distributions available for the Raspebry Pi. Here are also detailed explanations of general installation instructions of an image to a memory card on Linux, Windows and Mac OS.

There are some Raspberry Pi distributions available, that can be used for Pentesting:
I installed the Kali image, as it is most likely that this distribution will be maintained better than the other two. PwnPi and Raspberry Pwn are both from 2012.

If you install the Kali image on a Unix system, just use dd:

root@kali:~ dd if=kali-pi.img of=/dev/sdb bs=512k

Of course you need to change /dev/sdb to your actual device where you want to write the image to.

If you install the Kali image to the memory card on a Windows system, you can use Win32 Disk Imager.

After installation just plug the memory card into your Raspberry Pi and boot up Kali Linux. After login with user root and password toor your should reset the root password and start the ssh-service. The basics for Kali can be found here.

If you connect now via ssh to your Raspberry Pi and ask yourself: "How can I start tools that need a X-Server?", just do the following on your Linux / Mac OS X client:

ssh -X <username>@<IP-of-Raspberry-Pi>

After you connected to it you can start for example wireshark and it will pop up on your client but will run on your Raspberry Pi. So you don't need any monitor or keyboard on it, you can do anything from remote.

If you are using Windows, you can also do this trick via the -X flag. You just need to install an X-Server on your windows machine, like Xming and connect via Putty.

To automatically start ssh during the boot process, just execute the following command:
update-rc.d ssh enable
Now you have a simple little pentesting gadget that you can use either to support you during onsite penetration tests or as an intruder showcase to just scare your management/customer as how an attacker could easily hide the gadget in the suspended ceiling of the office and eavesdrop your network.


Monday, 19 August 2013

Killing (Deleting) Facebook Account - quick'n'dirty

Hi there,

I've been registered at Facebook since 2009. Now I've killed my account. This has several reasons:

- Since I've registered the spam and ads are increasing and now Facebook want's the users to watch ad videos in their timeline. So Facebook is just an advertising rostrum.
- I've been registered at ADN and really like it much more than Twitter or Facebook, I have to pay for it, but that's totally worth it as there are no ads.
- I don't want Facebook to track me and my behavior and Facebook has no real value to me anymore when compared to all the privacy issues.
- Instead of clicking dump Like Buttons of actions people talk about, I want to talk to a few people in real life or do a chit-chat via phone without any distractions. I don't even concentrate on the conversation when I was chatting via Facebook as I was always doing something aside, like googling, scrolling the Facebook timeline etc. Of course that's no real argument against Facebook, but a behavior that I want to change and Facebook is not supporting me by achieving this.
- Several weeks ago I've read a tweet, unfortunately I don't have a link to it, that Facebook is the new "going to the kitchen and looking in the fridge". And exactly that's how I feel when I'm using Facebook, sometimes I just think it's a waste of time.

So this is what I've done:

1. I requested for a copy of all my Facebook data. You can make this request when you go to your preferences and click on the link "download your Facebook data". An e-mail will be send to you with a download link. I've got the e-mail after some minutes and download the archive.

2. As I couldn't find a button for deleting my account in the preferences (I thought that it would be hard to find the delete button), I could find the following link in a blog:

https://www.facebook.com/help/delete_account

3. After clicking on this link your account is deleted. But it is only deleted if you don't login for the next 14 days. If you log in your account will be reactivated.

4. Use your free time wisely :-)


Sunday, 20 January 2013

OVA VMware Fusion

Hey there,

I'm using VMware Fusion Version 4 and wanted to open a .ova file. I just wanted to play around a little on https://www.hacking-lab.com/, and the they provide a full virtual machine that is ready to connect to their test network via VPN. Unfortunately VMware Fusion 4 won't open it. According to the docs of VMware Fusion 5 you can just import an .ova file (http://pubs.vmware.com/fusion-5/index.jsp?topic=%2Fcom.vmware.fusion.help.doc%2FGUID-275EF202-CF74-43BF-A9E9-351488E16030.html), but that's not working in VMware Fusion 4.

I just found a tool called OVF Tool by VMware. Yo can download it here:

https://my.vmware.com/group/vmware/get-download?downloadGroup=OVF-TOOL-3-0-1 (you will need an account on VMware to download it)

After installing the command ovftool is availabe in "/Applications/VMware OVF Tool" in the CLI.

Here you can get the full user guide of ovtool or just enter

# ./ovftool --help

at the command prompt in the folder "/Applications/VMware OVF Tool".

By using the following command I could convert the .ova to .vmwarevm. You just need to enter the source file and your target where you want to save it:

./ovftool /Users/<username>/Downloads/lcd596vmware8.ova  /Users/<username>/Downloads/lcd596vmware8.vmwarevm


Maybe you can also just convert it to vmx or another fileformat which is more efficient, because now the file size increased from 2.6GB to 7 GB. But at least I can open it now.

Monday, 15 October 2012

Rebuild MiniPwner

Hi,

I just wanted to use my MiniPwner again after some months where it was just placed on my desk and unfortunately I forget the password and I also didn't wrote it in my KeePass File.

So I had to reinstall it. Luckily there is a rebuilding instruction of the MiniPwner in case there went something wrong with your MiniPwner (or you just forget about the password ;-) ).

In the rebuilding instructions it is mentioned to get the "squash-sysupgrade.bin". I couldn't get it on this URL as the folder is empty. So I used the latest firmware "openwrt-ar71xx-generic-tl-wr703n-v1-squashfs-factory" for the TP-Link router from this directory on openwrt. The MD5Sum I got was:


root@Pulse:/tmp# md5sum owrt.bin
5d7bac7b467c42e215c60fcd0a00cc01
The image is available again.

On your Client where you've placed your openwrt image, you just start your netcat server.

# nc -l -p 3333 < openwrt-ar71xx-generic-tl-wr703n-v1-squashfs-factory.bin

On your TP-Link now just get the image via netcat:

# nc 192.168.1.2 3333 > /tmp/owrt.bin

The file should be on your TP-Link within a few seconds so you can abort the netcat session on it. After that just install the firmware:

# mtd -r write 703.bin firmware

After the installation of the firmware is done, which shouldn't take longer than one or two minutes, you need to configure your interface of the client that is connected to TP-Link to DHCP. The IP of TP-Link should be 192.168.1.1. You can now telnet to this IP:


$ telnet 192.168.1.1
Trying 192.168.1.1...
Connected to 192.168.1.1.
Escape character is '^]'.
 === IMPORTANT ============================
  Use 'passwd' to set your login password
  this will disable telnet and enable SSH
 ------------------------------------------

BusyBox v1.19.4 (2012-08-26 12:49:54 UTC) built-in shell (ash)
Enter 'help' for a list of built-in commands.
  _______                     ________        __
 |       |.-----.-----.-----.|  |  |  |.----.|  |_
 |   -   ||  _  |  -__|     ||  |  |  ||   _||   _|
 |_______||   __|_____|__|__||________||__|  |____|
          |__| W I R E L E S S   F R E E D O M
 -----------------------------------------------------
 ATTITUDE ADJUSTMENT (12.09-beta, r33312)
 -----------------------------------------------------
  * 1/4 oz Vodka      Pour all ingredients into mixing
  * 1/4 oz Gin        tin with ice, strain into glass.
  * 1/4 oz Amaretto
  * 1/4 oz Triple sec
  * 1/4 oz Peach schnapps
  * 1/4 oz Sour mix
  * 1 splash Cranberry juice
 -----------------------------------------------------
root@OpenWrt:/# 
You should now change your root password so that you can login via ssh in the future. Then you can ssh to your TP-Link and can continue the installation instructions on minipwner.org at step 12.

You can also navigate now to the Webgui under http://192.168.1.1/cgi-bin/luci.

IMPORTANT:


Right now it is not possible to execute "opkg update" as all the files in http://downloads.openwrt.org/snapshots/trunk/ are missing. There are several tickets about this issue, here and here.

But they are both almost 2 weeks old and it's not clear when the files are coming back. So here is what I did (thanks to flyingstar16, who posted this hint in one of the tickets):

1. Comment out the lines in /etc/opkg/xwrt.conf

root@Pulse:/etc# vim opkg/xwrt.conf
#src/gz X-Wrt http://downloads.x-wrt.org/xwrt/snapshots/trunk/ar71xx/packages

2. Comment out the line to http://downloads.openwrt.org/snapshots/trunk/ar71xx/packages as it is not working and add the line "src/gz attitude_adjustment http://downloads.openwrt.org/attitude_adjustment/12.09-beta/ar71xx/generic/packages"

root@Pulse:/etc# vim opkg.conf


src/gz attitude_adjustment http://downloads.openwrt.org/attitude_adjustment/12.09-beta/ar71xx/generic/packages
#src/gz snapshots http://downloads.openwrt.org/snapshots/trunk/ar71xx/packages
dest root /
dest ram /tmp
lists_dir ext /var/opkg-lists
option overlay_root /overlay

3. Now you can execute opkg update.


Some other hints:

When copying all the files in Step 19 in /etc/ to make a backup of them, I hadn't a firewall config and fstab. See my output:


root@OpenWrt:/usr/share# cp -f /etc/config/network /etc/config/network.orig
root@OpenWrt:/usr/share# cp -f /etc/config/wireless /etc/config/wireless.orig
root@OpenWrt:/usr/share# cp -f /etc/config/firewall /etc/config/firewall.orig
root@OpenWrt:/usr/share# cp -f /etc/profile /etc/profile.orig
root@OpenWrt:/usr/share# cp -f /etc/config/fstab /etc/config/fstab.orig
cp: can't stat '/etc/config/fstab': No such file or directory
root@OpenWrt:/usr/share# cp -f /etc/opkg.conf /etc/opkg.conf.orig
root@OpenWrt:/usr/share# cp -f /etc/config/system /etc/config/system.orig
root@OpenWrt:/usr/share# cp -f /etc/config/dhcp /etc/config/dhcp.orig
root@OpenWrt:/usr/share# cp -f ./network.1 /etc/config/network
cp: can't stat './network.1': No such file or directory
root@OpenWrt:/usr/share# cp -f ./wireless.1 /etc/config/wireless
cp: can't stat './wireless.1': No such file or directory
root@OpenWrt:/usr/share# cp -f firewall.1 /etc/config/firewall
cp: can't stat 'firewall.1': No such file or directory


But everything worked fine. I also skipped step 20 and 21 as the right MAC-Address for WiFi was already in the config. 

Here is a good explanation how to configure WiFi in OpenWRT.

Have fun.

Sunday, 23 September 2012

Setup a Mailserver

Hy,

this post is not about pentesting, but this weekend I had to move a domain of a friend of mine to my Debian server. After moving the domain I needed also to setup a (IMAP-) mail server. I'm not so good into configuring a whole mailserver system, but I found this really great tutorial:

http://workaround.org/ispmail/squeeze/

It worked just like a charme. And even if you have a problem just look in the comments, there is for sure someone that already had the same problem. If not, look in /var/log/mail.log ;-)

Cheers.

Thursday, 6 September 2012

Perl and https requests

Hi there,

today I was in the mood in writing some little perl script that I need for a project. To get the perl script running it was needed to execute some https requests.

First I was installing LWP::UserAgent and HTTP::Request via cpanm. Then I was writing a basis script that was executing a http request. I'm only interested in the header, so I don't want to print out the body content (I've found this litte code snippet here).

 #!/usr/bin/perl  
 use LWP::UserAgent; 
 use HTTP::Request;  

 my $URL = 'http://www.example.com/';  
 my $agent = LWP::UserAgent->new(env_proxy => 1,keep_alive => 1, timeout => 30);  
 my $header = HTTP::Request->new(GET => $URL);  
 my $request = HTTP::Request->new('GET', $URL, $header);  
 my $response = $agent->request($request);  

 if ($response->is_success){  
     print "URL:$URL\nHeaders:\n";  
     print $response->headers_as_string;  
 }elsif ($response->is_error){  
     print "Error:$URL\n";  
     print $response->error_as_HTML;  
 }  

This worked for me very well, but I needed to create a https request. When I was executing the same script with https instead of http I was getting the following error:

 Error:https://www.example.com/  
 <html>  
 <head><title>An Error Occurred</title></head>  
 <body>  
 <h1>An Error Occurred</h1>  
 <p>501 Protocol scheme 'https' is not supported (LWP::Protocol::https not installed)</p>  
 </body>  
 </html>  

So, I need to install LWP:Protocol:https, but this wasn't working:

 $ sudo cpanm LWP::Protocol::https  
 --> Working on LWP::Protocol::https  
 Fetching http://www.cpan.org/authors/id/G/GA/GAAS/LWP-Protocol-https-6.03.tar.gz ... OK  
 Configuring LWP-Protocol-https-6.03 ... OK  
 ==> Found dependencies: IO::Socket::SSL  
 --> Working on IO::Socket::SSL  
 Fetching http://www.cpan.org/authors/id/S/SU/SULLR/IO-Socket-SSL-1.76.tar.gz ... OK  
 Configuring IO-Socket-SSL-1.76 ... OK  
 ==> Found dependencies: Net::SSLeay  
 --> Working on Net::SSLeay  
 Fetching http://www.cpan.org/authors/id/M/MI/MIKEM/Net-SSLeay-1.48.tar.gz ... OK  
 Configuring Net-SSLeay-1.48 ... OK  
 Building and testing Net-SSLeay-1.48 ... FAIL  
 ! Installing Net::SSLeay failed. See /root/.cpanm/build.log for details.  
 ! Bailing out the installation for IO-Socket-SSL-1.76. Retry with --prompt or --force.  
 ! Bailing out the installation for LWP-Protocol-https-6.03. Retry with --prompt or --force.  

Openssl was installed, but I needed to install "build-essential libssl-dev" to get the installation of LWP:Protocol_https working:

 $ sudo apt-get install build-essential libssl-dev  

Now https requests can be made with perl:

 #!/usr/bin/perl  
   
 use LWP::UserAgent;  
 use HTTP::Request;  
   
 my $URL = 'https://www.twitter.com/';  
   
 my $ua = LWP::UserAgent->new(ssl_opts => { verify_hostname => 1 });  
 my $header = HTTP::Request->new(GET => $URL);  
 my $request = HTTP::Request->new('GET', $URL, $header);  
 my $response = $ua->request($request);  
   
 if ($response->is_success){  
     print "URL:$URL\nHeaders:\n";  
     print $response->headers_as_string;  
 }elsif ($response->is_error){  
     print "Error:$URL\n";  
     print $response->error_as_HTML;  
 }  
   

Response of twitter.com on port 443:

   
 $ ./hsts.pl   
 URL:https://www.twitter.com/  
 Headers:  
 Cache-Control: no-cache, no-store, must-revalidate, pre-check=0, post-check=0  
 Date: Thu, 06 Sep 2012 21:22:33 GMT  
 Pragma: no-cache  
 ETag: "f7a8e95e2978ac6f73209336152b9495"  
 Server: tfe  
 Vary: Accept-Encoding  
 Content-Length: 47126  
 Content-Type: text/html; charset=utf-8  
 Expires: Tue, 31 Mar 1981 05:00:00 GMT  
 Last-Modified: Thu, 06 Sep 2012 21:22:33 GMT  
 Client-Date: Thu, 06 Sep 2012 21:22:33 GMT  
 Client-Peer: 199.59.148.10:80  
 Client-Response-Num: 1  
 Content-Base: http://twitter.com/  
 Link: <http://a0.twimg.com>; rel="dns-prefetch"  
 Link: <http://api.twitter.com>; rel="dns-prefetch"  
 Link: </favicons/favicon.ico>; rel="shortcut icon"; type="image/x-icon"  
 Link: <http://a0.twimg.com/a/1346884958/t1/css/t1_core_logged_out.bundle.css>; media="screen"; rel="stylesheet"; type="text/css"  
 Link: <https://twitter.com/>; rel="canonical"  
 Link: <http://a0.twimg.com/a/1346884958/t1/css/t1_more.bundle.css>; media="screen"; rel="stylesheet"; type="text/css"  
 Refresh: 0; URL=/?_twitter_noscript=1  
 Set-Cookie: k=10.36.21.101.1346966553057924; path=/; expires=Thu, 13-Sep-12 21:22:33 GMT; domain=.twitter.com  
 Set-Cookie: guest_id=v1%3A134696655306150737; domain=.twitter.com; path=/; expires=Sun, 07-Sep-2014 09:22:33 GMT  
 Set-Cookie: _twitter_sess=BAh7CSIKZmxhc2hJQzonQWN0aW9uQ29udHJvbGxlcjo6Rmxhc2g6OkZsYXNo%250ASGFzaHsABjoKQHVzZWR7ADoPY3JlYXRlZF9hdGwrCOaBdp05AToMY3NyZl9p%250AZCIlNThkNmZkYjY2ODJjNTc0MzY0YTY2Y2M0YjI0OGU2NWE6B2lkIiUwMmUz%250AZTJjY2VkMjFiYWNmZjQ5MmI2MjQyNWU5ZTJiMw%253D%253D--7d08430b6a85e0006ac4c062a4218d5cf841f564; domain=.twitter.com; path=/; HttpOnly  
 Status: 200 OK  
 Title: Twitter  
 X-Frame-Options: SAMEORIGIN  
 X-Meta-Charset: utf-8  
 X-Meta-Description: Verbinde Dich sofort mit den Dingen, die für Dich am wichtigsten sind. Folge Freunden, Experten, Lieblingsstars und aktuellen Nachrichten.  
 X-MID: e88c4d8fc53fc1466f24f3cbc905d24fd89af901  
 X-Runtime: 0.07026  
 X-Transaction: 4998cc5789e9b2c0  
 X-UA-Compatible: IE=edge  
 X-XSS-Protection: 1; mode=block  


First step is done :-)

Sunday, 2 September 2012

Vulnerable Web Applications

Hey there,

really a long time without a new post, but hopefully this will change in the future.

In this post I was listing some vulnerable VMs that can be used for pentesting at home. There are also several vulnerable Web Applications available, that can be used for pentesting. I've found a really great overview of vulnerable Web Applications.

I will use for local testing now Damn vulnerable Web Application (DVWA)

Here is a short description about DVWA copied from the DVWA website:
Damn Vulnerable Web App (DVWA) is a PHP/MySQL web application that is damn vulnerable. Its main goals are to be an aid for security professionals to test their skills and tools in a legal environment, help web developers better understand the processes of securing web applications and aid teachers/students to teach/learn web application security in a class room environment.
So the only thing you will need, after downloading DVWA is Apache/PHP/MySQL environment. This      can be easily realized with XAMPP, as it is a full package containing Apache Webserver with PHP and a MySQL Database and is available for a lot of plattforms (Mac OS X/ Windows / Linux / Solaris).

Hopefully I will have some time to execute a pentest against DVWA and to post some findings about it :-)


Tuesday, 13 March 2012

MiniPwner

Hey folks,

after waiting for two months my TP-Link Router has finally arrived yesterday. I'm not quite happy how the order was processed by volumerates.com. I ordered the TP-Link on 16th of January and volumerates gave an information in the automated E-Mail (after buying the router) that customers should write an E-Mail to them if they didn't get any response by volumerates.com within one week.
I didn't get any response within one week so I decided to write an E-Mail to them. => No Answer.
After another 4 weeks (I was in vacation abroad) still no answer. So I wrote another E-Mail => No Answer.
Then I openend a ticket on http://www.volumerates.com/. => No Answer.
I had no information at all for two months and there were also no E-Mails in my Spam Folder. Just one respond to my E-Mail that it will take one or two months would have been very good. I already thought my money is lost...

The happy part though is that it finally arrived and the installation instruction on MiniPwner.com worked as a charm.

Now I've got a fully working pentesting device with a RJ45 port, Wi-Fi and one USB-Port running OpenWRT. The USB-Port is already used by a 8 GB USB Flash-Drive.

Here a short overview of the installed tools so far:

root@OpenWrt:~# opkg list
aircrack-ng - 1.1-3
base-files - 104-r30857
base-files-network - 3
blkid - 1.42-1
block-mount - 0.2.0-7
busybox - 1.19.3-10
bzip2 - 1.0.6-1
crda - 1.1.1-1
dnsmasq - 2.59-2
dropbear - 2011.54-2
dsniff - 2.4b1-2
elinks - 0.11.7-1
firewall - 2-47
hotplug2 - 1.0-beta-4
iptables - 1.4.10-4
iw - 3.3-1
kernel - 3.2.9-1-7ca3c65ac3709dabad42d460596851da
kismet-client - 2010-07-R1-1
kismet-server - 2010-07-R1-1
kmod-ath - 3.2.9+2012-02-27-1
kmod-ath9k - 3.2.9+2012-02-27-1
kmod-ath9k-common - 3.2.9+2012-02-27-1
kmod-cfg80211 - 3.2.9+2012-02-27-1
kmod-crypto-aes - 3.2.9-1
kmod-crypto-arc4 - 3.2.9-1
kmod-crypto-core - 3.2.9-1
kmod-fs-ext4 - 3.2.9-1
kmod-gpio-button-hotplug - 3.2.9-1
kmod-ipt-conntrack - 3.2.9-1
kmod-ipt-core - 3.2.9-1
kmod-ipt-nat - 3.2.9-1
kmod-ipt-nathelper - 3.2.9-1
kmod-leds-gpio - 3.2.9-1
kmod-ledtrig-usbdev - 3.2.9-1
kmod-lib-crc-ccitt - 3.2.9-1
kmod-lib-crc16 - 3.2.9-1
kmod-mac80211 - 3.2.9+2012-02-27-1
kmod-nls-base - 3.2.9-1
kmod-ppp - 3.2.9-1
kmod-pppoe - 3.2.9-1
kmod-scsi-core - 3.2.9-1
kmod-tun - 3.2.9-1
kmod-usb-core - 3.2.9-1
kmod-usb-ohci - 3.2.9-1
kmod-usb-storage - 3.2.9-1
kmod-usb2 - 3.2.9-1
kmod-wdt-ath79 - 3.2.9-1
libblkid - 1.42-1
libbz2 - 1.0.6-1
libc - 0.9.33-104
libcom_err - 1.42-1
libext2fs - 1.42-1
libgcc - 4.6-linaro-104
libgdbm - 1.9.1-2
libip4tc - 1.4.10-4
liblzo - 2.05-1
libncurses - 5.7-5
libnet0 - 1.0.2a-8
libnids - 1.18-1
libnl-tiny - 0.1-2
libopenssl - 1.0.0g-1
libpcap - 1.1.1-1
libpcre - 8.11-2
libpthread - 0.9.33-104
libreadline - 5.2-2
librpc - 0.9.32-rc2-0a2179bbc0844928f2a0ec01dba93d9b5d6d41a7
libstdcpp - 4.6-linaro-104
libuci - 2012-02-24.1-1
libuuid - 1.42-1
libxtables - 1.4.10-4
mtd - 17
nbtscan - 1.5.1
netcat - 0.7.1-2
nmap - 5.51-3
openssh-sftp-client - 5.9p1-4
openvpn - 2.2.1-5
opkg - 618-2
perl - 5.10.0-7
ppp - 2.4.5-4
ppp-mod-pppoe - 2.4.5-4
samba2-client - 2.0.10-8
samba2-common - 2.0.10-8
snort - 2.8.4.1-3
swap-utils - 2.13.0.1-4
swconfig - 10
tar - 1.23-1
tcpdump - 4.2.1-1
terminfo - 5.7-5
uboot-envtools - 2011.06-4
uci - 2012-02-24.1-1
uclibcxx - 0.2.2-3
wireless-tools - 29-4
wpad-mini - 20111103-3
yafc - 1.1.1-2
zlib - 1.2.5-1

Tuesday, 17 January 2012

Pentesting Devices / Gadgets

There are three devices I have found, that can be very useful if you're executing a (physical) security pentest:
All of these devices are just as big as a cigarette packet and to make a long story short they can be described like this:

They are designed as a small, simple but powerful device that can be inconspicuously plugged into a network and provide the penetration tester remote access to that network.
(Quote from "What is the Mini Pwner")


The great thing about the Mini Pwner is, that you can easily build one on your own. I just purchased yesterday the TP-Link TL-WR703N router and hopefully I will get it next week. When I have time, I will build it in the next week and post about it here in my blog.

An comparision between Pwnie Express and Mini Pwner can be found here.

Monday, 16 January 2012

Increasing virtual disk in ESX 3.5

My installation of BackTrack has only a 10 GB virtual disk, because I was using the default settings when I installed it. Now I want to increase it to 25 GB.

This can be done through opening the VMware Infrastructure-Client (only available for Windows). After it has started, you have to right-click on the virtual machine that needs a bigger virtual disk and choose "Edit Settings" in the context menu. Then you have to select "Virtual Disk" Now you can increase the size of the disk and confirm the new size with "Ok".


All the steps I just described can also be done, when the VM is still running. As a next step we need to increase the partition, so that the VM will recognize the new space and that the disk size has changed. For this task we will use GParted. We just need to download the GParted ISO and upload it to the ESX server so that we can select it in the VM settings as "Datastore ISO File". With this settings the VM will boot up GParted when the VM is starting:


If GParted won't boot (in my case I had this problem), you have to force the VM to go into the BIOS settings and change the boot order (CD-Rom should be first, at least before HD ;-)


After a new try to boot GParted, we can see now that GParted is actually booting :-)


After selecting the key-map I couldn't just start X. I had to configure it through the wizard first, otherwise I was getting this error (see also screenshot):

Virtual width (1184) is too large for the hardware (max 1180)
Screen(s) found, but none have a usable configuration.


You have to select "Run Forcevideo to config X manually" and click through the wizard. You should take a resolution of 800x600.


Now GParted should have started and you just have to make a right-click on the unused space and create a new partition with an ext4 filesystem.


After the changes have been applied, there is a new partition with 15 GB.


After a reboot we just need to modify /etc/fstab. With fdisk -l we can see all harddisks and partitions:


/dev/sda3 is my new partition with almost 15GB and will now be added to /etc/fstab as new partition for /root. We just need to find out the UUID to insert it into fstab:


That's it :-)


URL
VMware Increasing virtual disk size

Sunday, 15 January 2012

Information Gathering of Apache on Metasploitable

After bruteforcing Postgresql and MySQL, it's now time to prepare an attack to the Apache Webserver. I will try to get as much information about the webserver as possible to prepare an attack. The IP of my Metasploitable VM is 192.168.178.65.

First we're starting the burp interception proxy. You can find burpsuite in the Backtrack Applications directory:


The version of burp used within BackTrack is of course only the "Free Edition" and not the "Professional Edition". Here you can get a comparison of both versions. In the future I will use the ZAP proxy provided by OWASP, but for this phase the capabilities of the burp "Free Edition" is sufficient.

To use burp as an interception proxy you just need to configure your browser to use the burpsuite as a proxy server.


When you're browsing now to the IP of Metasploitable, you will see the HTML request under the proxy Tab "intercept" in burp. This HTML requests can now be modified, forwarded or dropped.

As we already know from our successful MySQL Brute Force attack, there should be a tikiwiki installation available. And we already know the login credentials (admin:admin). So let's just give it a try:

http://192.168.178.65/tikiwiki

And there is an installation of tikiwiki available :-) Now you just need to login via the  login form in the tikiwiki with the credentials admin:admin. After the successfull authentication we have to change the password, and we are already admin in the tikiwiki:


It is version 1.9.5 of TikiWiki


Now we should spider the directory of tikiwiki, to see what files and directories are available. This can be done when clicking on the "target" tab in burp. There you will see all the files and directories you just have been browsed manually. By clicking the right mouse button, a context menu will appear:


When you click on "spider this branch" burp will run through all links he can find in this branch and will create an index with all available directories and files he is finding. Through this commando you can get an overview of the web application and know what frameworks and programm languages and so an are used.

Another good method to get information about the installed webserver and modules or programming languages that are used, is to force an error. By just requesting a website that is not available, the default error pages are generating very informative error messages:


Know we know that Apache version 2.2.8 with PHP version 5.2.4 is used and that the OS is very likely an Ubuntu installation.

Nmap did also find another webserver on Port 8180:


A default installation of Tomcat version 5.5 is also available by Metasploitable. I can login via tomcat default credentials (tomcat:tomcat) to Status,  Tomcat Administration and Tomcat Manager.

So let's just sum up what we have found till now:

SoftwareVersion
Apache2.2.8
PHP5.2.4
TikiWiki1.9.5
Apache Tomcat5.5

With this information, we should be able to find some vulnerabilities for this pretty old software in known ressources and of course some public available exploits :-)

Brute Forcing Postgres

After brute forcing MySQL I wanted to brute force the next service, this time PostgreSQL. Again the output of the nmap scan against Metasploitable:

PORT STATE SERVICE VERSION

21/tcp open ftp ProFTPD 1.3.1

22/tcp open ssh OpenSSH 4.7p1 Debian 8ubuntu1 (protocol 2.0)
23/tcp open telnet Linux telnetd
25/tcp open smtp Postfix smtpd
53/tcp open domain
80/tcp open http Apache httpd 2.2.8 ((Ubuntu) PHP/5.2.4-2ubuntu5.10 with Suhosin-Patch)

139/tcp open netbios-ssn Samba smbd 3.X (workgroup: WORKGROUP)
445/tcp open netbios-ssn Samba smbd 3.X (workgroup: WORKGROUP)
3306/tcp open mysql MySQL 5.0.51a-3ubuntu5
5432/tcp open postgresql PostgreSQL DB 8.3.0 - 8.3.7
8009/tcp open ajp13?
8180/tcp open http Apache Tomcat/Coyote JSP engine 1.1


This time, I'm just using Metasploit to brute force:

#msfconsole
#search postgresql
#use auxiliary/scanner/postgres/postgres_login
#show options
#set RHOSTS <Target IP>
#set VERBOSE false
#exploit

Metasploit ships already with a default user and password list for brute forcing, so we don't have to specify other lists. If you wan't to use another user- and password lists, see my post about MySQL Brute Forcing. There I'm explaining where to get and how to use user- and password lists within Metasploit and THC Hydra.


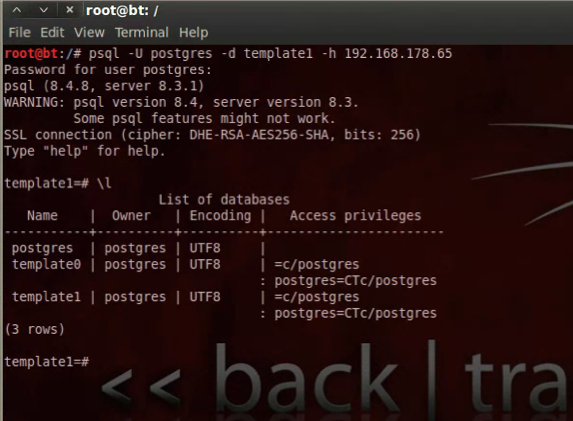
There is no postgresql-client available in BackTrack, so we have to install it to check the finding:

#apt-get install postgresql-client

Then psql can be started:


Seems like a default postgres installation with no data inside. 

Brute Forcing MySQL

I just did my first nmap scan against the Metasploitable Virtual Machine. There are several open ports and a lot of services running on the VM. Here is a listing of the services found by nmap:


PORT STATE SERVICE VERSION

21/tcp open ftp ProFTPD 1.3.1

22/tcp open ssh OpenSSH 4.7p1 Debian 8ubuntu1 (protocol 2.0)
23/tcp open telnet Linux telnetd
25/tcp open smtp Postfix smtpd
53/tcp open domain
80/tcp open http Apache httpd 2.2.8 ((Ubuntu) PHP/5.2.4-2ubuntu5.10 with Suhosin-Patch)

139/tcp open netbios-ssn Samba smbd 3.X (workgroup: WORKGROUP)
445/tcp open netbios-ssn Samba smbd 3.X (workgroup: WORKGROUP)
3306/tcp open mysql MySQL 5.0.51a-3ubuntu5
5432/tcp open postgresql PostgreSQL DB 8.3.0 - 8.3.7
8009/tcp open ajp13?
8180/tcp open http Apache Tomcat/Coyote JSP engine 1.1


First I wanted to execute some brute-force attacks against the MySQL database that is running in Metasploitable. There are different ways of brute-forcing it, but your scanner is just as good as you're wordlist or wordcombination files for usernames and passwords are (here are username and password lists for a first shot).

As password list, I'm using elitehacker.txt.bz2 provided by skullsecurity.org and I defined six different users:


root@bt:~/test_environment/brute_force# cat username.txt 
admin
root
mysql
db
test
user


I inserted also all of these six users and a blank line into the elitehackers.txt password file.


1. Using Metasploit

#msfconsole
#search mysql
#use auxiliary/scanner/mysql/mysql_login
#show options
#set RHOSTS <Target IP>
#set USER_FILE /root/<your_username_file>
#set PASS_FILE /root/<your_password_file>
#exploit


The verbose mode is set by default to true, so you can see all login attempts. This is not very convenient, because of two reasons:

a) If the brute force attempt is successful you have to scroll back the whole list of attempts to find the login as there is no summary after finishing the mysql_login module (can be very nasty).
b) The actual scan time is decreasing dramatically. When I was scanning with verbose set to true, it took me 5 Minutes and 5 Seconds. After deactivating verbose mode, the scan was done in 2 Minutes and 5 Seconds.

Conclusion => #set VERBOSE false


2. Using THC Hydra

#hydra -L /root/<your_username_file> -P /root/<your_password_file> <IP> mysql


3. Result

So here is an overview of the results (all scans were executed with the same user- and passwordfile).

mysql_login (verbose mode activated)5 Minutes 5 Seconds
mysql_login (verbose mode deactivated)2 Minutes 5 Seconds
THC Hydra4 Minutes 8 Seconds

It was just a very small brute-forcing attack (5.412 username/password combinations), but Metasploit took almost 25% more time than Hydra with the same wordlists when verbose mode is activated in mysql_login.

If verbose mode is deactivated it is by far the most effective way to brute force mysql.

I don't know if this will scale in the same manner if the brute force attack will have more combinations, but the mysql_login module of Metasploit seems more efficient for mysql brute forcing than THC Hydra.

So let's check this finding manually:


So now we have another login, for a new attack :-)